

Hiii :)
Today's post is the follow up from my Part 1 over on the lovely Jess' blog, Dungarees and Donuts. I wanted to share with you my go-to Day to Night makeup look I've been recently loving for autumn. It's subtle, beautifying and makes use of some of the gorgeous fall colours; goodbye coral!
It's a great one for those office-to-dinner-with-no-time-in-between days.


Now onto the evening additions :) This look is something I would wear to a casual evening event, dinner or drinks (or both?!) with friends/work colleagues is perfect, or anywhere where I want to look like I've at least made an effort but haven't tried too hard! (I've left everything as it was from the day look)
SKIN

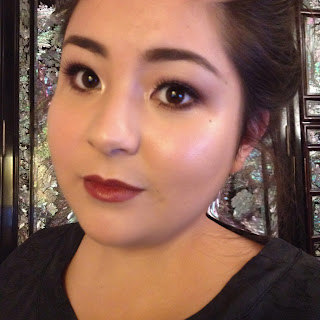
This Illamasqua foundation wears beautifully throughout the day and because I only really applied it through my nose and the tops of my cheeks, I top up and apply a little more now where I feel I need it. Also for the evening, I like to get a little more "targeted glow" (no mirrorshine forehead please!) and so apply the Topshop Glow highlighter in Polished to the tops of my cheekbones. I usually dislike this highlighter as it gives a rose gold look to the skin which some of you may like, but actually it ties in quite nicely with the rest of the makeup.
EYES


Using the daytime eyes as a base, I take Coastal Scents shadow in Rich Walnut (Bourjois' Colour Edition 24H in Prune Nocturne is a good alternative/dupe) and blend that (pretty messily) onto my lids before topping up on the Avon highlight from earlier and a little more liner to make the eyes slightly more dramatic. I also take some of the Rich Walnut under the eyes and apply mascara to my lower lashes too. Finally, I take some dark brown shadow through my brows to strengthen them a little: it's funny how stronger brows changes your look!
LIPS
Same product as before, this time I work it into the lips to create a stain and a gorgeous rich tone. Finish off with the lipbalm on the opposite end and voila, lips done!
In fact, that's the look done!

Hope you like and have an amazing day :)
Tigerlily ♥


Social Icons